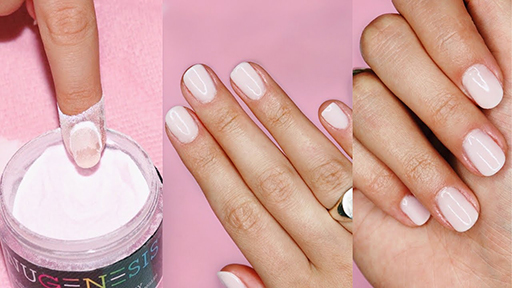
There is no denying that a perfect and tidy manicure will help their owners look better put-together and impressed! Manicure now is not only about nail arts and charms on those long acrylic nails.
Good news for short-nail lovers and nail-biting people alike, you can make your short nails look just as amazing with a gel overlay! This treatment is beneficial for your weak, brittle nails that are not likely to manage to get some more length that you always dream of.
If you are planning to get your gel overlay at home, or feel like giving it a go right at this point, scroll down for what you need!
What Is A Gel Overlay On Natural Nails?
Gel overlays are the coating of a thin gel layer (clear or pale pink) on top of your natural nails. The coating is made of hard gel or also known as builder gel, which gives your nails the much-needed strength to achieve natural growth.
In addition, this type of manicure does not involve the use of artificial nails since the gel will be applied directly to your nail plates. Unlike false nails, gel nail overlays do not extend your nails or add length to them.
Many people find themselves sitting on the fence between gel overlays and extensions, so here is a breakdown into these two different types of manicures.
With extensions, a plastic plate which resembles the nail’s shape is adhered to the tip of the nail to achieve the desired shape or length. Subsequently, a polish or gel is applied over the top of the extension before you can proceed to decorate the nails to your liking.
On the other hand, gel overlays do not use a plastic plate to extend the natural nails.
Only a layer of gel is applied directly to the nails before being shaped by hand and buffed for glossy effects. Since overlays do not use false nails, the nail shape after the application will depend on your natural nails.
Gel overlays add strength and length to your nails. The main purpose of this type of manicure is to give you a more natural, simplified look while aiding in the growth of your natural nails.

Simplified Yet Gorgeous Look Of A Gel Overlay
So, what are gel overlays for? They are a great choice for those with weak nails and struggling to grow their nails. Gel protects and strengthens the nails, which allows them to grow longer and stronger.
Likewise, anyone who is not a fan of artificial nails due to their potential damage finds gel overlays a good option. Like fake nails, gel overlays still allow you the freedom of decorating your nails to your liking.
Gel overlay nails also fit the bill for those who love sporting short nails or work in professions where they cannot afford long nails but still desire some sort of manicure that is fancier and more long-lasting basic nail polish.
Is Gel Overlay Good For Your Nails?
The answer depends on the quality of the nail salon and how you treat your nails after the application.
In general, gel overlays help those with brittle, weak nails to have a better look, and facilitate their growth to some extent. This type of manicure simply involves adding an extra layer to your natural nails, which acts as a barrier to protect your nails against splits and breakage.
If you are a habitual nail biter or your profession just stops you from growing your nails, gel overlays can lend you a helping hand! People with longer nails can also benefit from gel overlays. They lend the long nails a glossy natural look while also offering protection against external damages.
That said, just to be fair, we still let you in on some potential issues with this type of manicure, so you can make a more informed choice.
Incorrect Application:
If you wrongly apply these overlays, you might end up with lifting around the edges whereas incorrect removal also causes peeling and damages to the bed nails, which further weakens the overall health of your nails.
No Break Between New Sets:
Not allowing some time for your nails to take a break in between new sets should also give you unwanted results.
Inappropriate Hygiene:
Any type of overlays (both gel and acrylic) can cause potential damages to your nails. The most common issues for this manicure are fungal and bacterial infection.
This often causes discoloration for your nails (often the greenish color in case of Pseudomonas) or other hues such as white or yellow spots under the nail. So, it’s best to talk to a doctor once you notice any of these signs.
This can happen both when you do your overlays at home or the salon, as long as the procedures are performed with appropriate hygiene.
For DIYers, before applying, you need to double-check the areas that the overlays will be applied to are clean and safe. It’s best to clean the surroundings, give your hands a good scrub down, and place a clean towel for your hands to rest onto.
If you do gel overlays at the salon, it pays to do your homework before taking the plunge.
Read online reviews to see what previous clients say about the salon, their expertise and whether they maintain a clean environment to give you a safe manicure. Your best bet is to choose a place with positive feedback!
Advantages And Disadvantages Of Gel Nail Overlays
Advantages Of Gel Nail Overlays
Fortify And Protect Your Bare Nails
Any overlay, gel or acrylic, will act as a protective layer against abuse and physical damage so the underneath nails can grow longer and stronger.
Firstly, the gel overlay will cover the entire length of your natural nails to boost the strength of the nails.
The apex curve and the structure you build in gel overlays also add more strength. On top of that, your nails are better protected by the durable and solid artificial material – gel.
Less Damaging To The Nail
If you are looking for something that is less harsh on your nails, doing gel overlays sounds like a good option!
Unlike acrylics, there is no extension involved in the process of gel overlaying.
Instead, the gel will be applied directly to your nails before being shaped using hands or the so-called “forms”. The nails are subsequently buffed to give a glossy effect and wow-factor for your nails.
Without the extension, gel overlays generally cause less damage to your natural nails.
Give A Lighter And More Natural Look
There are fewer products involved in the application, unlike gel nail extensions, so you won’t feel the bulkiness and weight as you would with extensions. The coating feels comfortably light and natural, which will fit the bill for those looking for a realistic-looking manicure.
Long-Lasting
Gel overlays are also well known for their long-lasting durability. You will encounter fewer lifting issues than gel nail extensions. Due to their shortness, there is less surface area to get abused and strained by your lifestyles.

Gel Overlays Are Long-Lasting
More Durable Than Nail Polish Manicure
When applied correctly, protected, and well-maintained, these coatings should last anywhere between 2-4 weeks. This gives gel overlays an edge over nail polish, which is usually good for 5 to 7 days.
Disadvantage Of Gel Nail Overlays
You Need A Nail Technician To Remove The Overlays
Although gel overlays are not as harsh as other manicures to remove, we still highly recommend visiting a nail salon to get your overlays professionally removed. It does not cost much money and saves you the headache that you do not ask for!
Do Not Extend The Nails
If you’re after long nails or simply want more room for nail art and polish, gel overlays are not the answer! Gel overlays do not extend the length of your nails.
After all, they just coat over the natural nails and offer better protection. For long and strong tips to the end of each nail, nail extensions are the way to go!
More Expensive Than Acrylic Nails
Although gel overlays are more flexible and less damaging to the nails, they set you back more money compared to acrylic nails. Plus, they are hard to fix on your own if there’s any issues while you’re applying.
How To Do A Gel Overlay On Natural Nails?
What You’ll Need
- Gel nail files
- Nail polish remover
- A primer
- A base gel
- A gel top coat
- Gel brush
- Builder gel/hard gel
- Cotton pads
- Cotton bud
- Cuticle remover
- Orange stick
- Cuticle knife
- UV light
Stepwise Guide
Step 1: Prep Your Nails
Soak cotton pads in non-acetone nail polish remover, and then wipe them down your nails.
Next, apply some cuticle remover on a cotton bud and then use it to wipe around the cuticle area on each nail. Then, lightly push back cuticles of all nails with an orange stick. If there are any excess cuticles, trim them off with a cuticle knife.
Step 2: Buff Your Nails
Give your nails a buff to remove moisture and create a good base for the gel to adhere to later. Once done, file the cuticle part.
Step 3: Apply The Primer
Before applying the first layer of gel, you need to coat your nail with a primer and wait for it to dry completely. Usually, a gel set will also come with its primer.
Step 4: Apply The Gel Base Coat
Now paint the gel base coat just like you do with nail polish. You may want to be careful in this step. It’s wise to start at the cuticle. The tip is to get close to the cuticle but not that tight close.
It would help if you left a tiny gap between the gel coat and the cuticle. If you completely cover the cuticle area, there should be a lift when the nail is cured.
Use a woodstick to remove all the excessive gel before curing your nails under LED or UV light for 1 minute. The curing time might vary depending on the requirements for a specific gel. Yet, make sure you don’t overdo it, or you will end up with lumps or air bubbles.
Step 5: Add The Next Layer Of Gel
Move on to the next coating of gel, which takes extra effort from you! First, coat your nails with a thin layer of gel.
Next, you need to give the center (from the nail bed to tip) a bit more gel. The purpose is to either flatter the lovely curve that your nails already have or lend your flat nails a nice curve it deserves. Please wait for some seconds before curing it under the LED/UV light.
Step 6: File And Buff The Nails
You can file down the nails and create the shape you desire in this stage. Gently file and avoid exerting too much pressure; you don’t want the file to make its way to the natural nails and ruin the look.
If you skip filing the nail after applying the second layer, use the buffer to smoothen out the nails and remove the shine.
Step 7: Add Your Favorite Color (Optional)
Clean all the residues with your acetone-free nail remover. Now you can color the nails the way you want. If you do not feel like giving your manicure a touch of color, it’s up to you to skip this and move to the final step.
Step 8: Apply The Gel Top Coat
Finish your manicure by applying a thin gel top coat over your nails. Remember to cover the free edges before curing your nails under the LED/UV light.
If you notice any sticky layer once you’re done, you can take a lint-free wiping pad and soak it into a non-acetone remover, then wipe over your nails to get rid of them.
Pro Tips To Maintain Your Gel Overlays
As mentioned, your overlay treatment can last for 2-4 weeks, depending on how you take care of your nails.
Here are a few things you can do to extend the longevity of your gel nail overlays:
Keep Your Well-Moisturized
Moisturizing is a crucial step in maintaining your overlays and ensuring the overall health of your nails. Unlike skin or scalp, nails do not possess the ability to produce natural oils.
This means that every time you wash your hands, the nails will be stripped off moistures, which can lead to brittleness.
This is even worse when you frequently wash your hands with a sanitizer because the alcohol in the solution will dehydrate your hands and nails.
That’s why it is important to keep your nails moist by applying a hand cream to your hands, and most importantly, nails once you finish rinsing your hands with a sanitizer!
Avoid Too-Hot Water
As good as a steamy shower feels, exposing your nails for a long time to hot water can soften and loosen the gel and destroy your manicure. Too-hot water can also weaken the nail polish.
In addition, extended exposure to the water can cause the fingernails to split because the cells made of the nails will shrink and swell while absorbing the water.
Thus, it makes sense to steer clear of hot water as much as possible, not only while showering, but also washing the dishes or other household chores.
In case lukewarm water is an alternative, go ahead to use it! In addition, you should wear protective gloves if needed to prevent your overlays from being exposed to water, harsh chemicals, and dirt.
Another thing you can do for your nails is to reduce the time that you let your hands contact with water.
Chemicals Ain’t Your Nails’ Friends, Too!
Chemicals such as chlorine or detergents in cleaning solutions are typically too harsh for your gel overlays to tolerate. If your nails come into contact with them, they will weaken, chip, discolor, etc.
Never forget to put on a pair of gloves to protect your nails against these elements while you’re doing the cleaning and washing.
A Second Top Coat, Why Not?
Nail technicians advise you to go for an additional top coat to give your gel overlays more protection against daily wear and tear and prolong the life of your manicure. You can get this coat at the nail salon where you get the overlay treatment or simply DIY at home.
Take Care Of Grow-Out Nails
Re-growth is inevitable, and once this happens, there is no need to abandon your overlays altogether. You can trim and file the grow-out parts off, and do a quick refill if needed!
Frequently Asked Questions
What Are The Similarities And Differences Between Gel Polish And Gel Overlay?
Similarities
Gel polish and gel overlays call for the same amount of attention while applying to get the perfect manicure. Besides, they require constant maintenance.
Whether with polish or overlay, nails will eventually grow out, so it’s best to not skip appointments to keep your nails in good conditions.
Abandon bad habits such as picking, biting, or pulling the nails when you get these manicures as it will only shorten their lifespan and give you nails an unkempt look.
Differences
- Soft Gel Vs. Hard Gel
There are a few key distinctions between gel polish and gel overlay, and it all comes down to the type of gel each treatment uses. Gel polish involves the application of soft gel, whereas gel overlay utilizes hard gel.
The hard gel in overlays is longer-lasting, which means that the manicure would last longer, and there is more time in-between your salon visits or at-home treatments.
Yet, there are some areas where gel overlays really shine. One major advantage is that they give your nail structure while strengthening and protecting your weak nails.
In addition, you can shape your nails the way you want, which is something you cannot achieve with gel polish.
- How Easy Are They To Remove?
While the hard gel used in overlays is more durable, it is tougher to remove than soft gel in the polish. Often, it revolves around soaking your nails multiple times in the remover and filing them down religiously.
This is not the case with gel polish. In general, the soft gel has higher porosity, which means that it cannot hold up to abuse and hard gel and won’t last as long.
You can simply soak the gel polish and remove it; as simple as that! This means there is not need to rely on a professional technician to remove the gel polish. Hence, gel polish is a great manicure to do at home, as it won’t take you as much effort as you will need with an overlay treatment.

Nail Polish Is Pain-Free To Remove
So, all in all, what you choose depends on your preferences; just examine their pros and cons and pick the option that speaks to your needs!
Can You Do Gel Overlay At Home?
Yes, you can do gel overlays on your natural nails at home!
Nail salons are obviously capable of giving you higher-quality manicures because they have well-trained technicians and essential tools. However, with the right supplies and patience, you can do gel overlays on natural nails right from the comfort of your home.
Beware that it can be a challenge for those just getting started. Our advice is to use a gel kit that comes with clear instructions to assist you in achieving the desired gel overlays.
So, what’s the challenge for DIY at-home “nail artists”? Gel overlays can be quite hard to apply as well as to remove. You risk getting some fungal infection for your nails if there’s something wrong in the process (human errors, perhaps!).
That’s why those who are not used to doing their own manicure or lack patience recommend seeking a professional nail salon to avoid unwanted infection and all the frustration along the way!
How Much Does A Gel Overlay Cost?
It depends on where you get your manis and the type of look you’re after. Typically, gel nail overlays can set you back from $35 to $100 and more (tips are not counted).
The more intricate you want your nail art to be, the more you must pay. $35-$40 is usually a starting point for a basic one-color overlay!
Leave a Reply